Monday, 29 June 2015

Peach Cobbler


Peach cobblers are perfect fruit based sweet treat for summers.. Goodness of peaches combined with cake like topping and served with a scoop of icecream,, wat can anyone ask for more.. I would love to call it a complete dessert meal..
                Cobbler is a dish which generally has a fruit filling with a cake like batter poured over and baked..  It can be made with almost any fruit.. Making peach cobbler has always been on my mind for a very long time.. And i wanted to try it out with fresh peaches rather than canned..And as peaches come for a very short period of time, I had to plan it well in advance.. It was the first time i made this dish.. One of the drawbacks i had in my dish was the peaches were less and the batter was more..  SO there was thick crust of batter over peaches after it baked.. Next time I would definitely keep this in mind... But then i have updated the recipe here accordingly... Make sure to pour enough batter only to cover the peaches.. This would be perfect.. Nevertheless, the taste was divine.. Hope you have a good time baking this dessert...


Ingredients:
1/4 cup butter
15-18 fresh peaches, peeled and sliced into quarters
1/3 cup sugar
1tsp cornstarch
1tbsp lemon juice
Pinch Salt
For batter:
1 1/2 cup all purpose flour
2tsp baking powder
1 cup castor sugar
1/4 tsp salt
2tsp vanilla essence
3/4 cup milk

Method: Mix peaches and sugar and keep aside for 30mins. Keep stirring occassionally.. The juice from peaches will ooze out.. Seive the juice.. Now in a pan, over medium heat, add the peaches, cornstarch, lemon juice, salt and 2tbsp of the drained out juice.. Cook for around 8-10 mins till peaches turn soft and mushy..Preheat oven at 200c.. In a glass dish, melt the butter.. Add in the peaches to cover the bottom of the dish.. Do not mix  and keep aside till you make the batter.. Mix all the ingredients of batter.. It should be runny, so adjust the milk accordingly.. Pour this over the peaches and bake at 200c for around 40mins till the top turns golden brown in color.. Serve it warm with a scoop of vanilla icecream.. 


Tuesday, 23 June 2015

Bread Rasmalai

Bread Rasmalai!!! One of the easiest dessert recipes that i have learnt from my mom.. And sure to impress guests... Originally, this is my mom's recipe, who made this very often, and served this cold in summers and with hot rabdi in winters.. My mom made this with only a single piece of bread roundel.. To take it to the next level, i added a sauce in between 2 bread roundels and then topped it with rabdi.. You can use any sauce or even a fruit puree of your choice.. A chocolate sauce would also be great..


Ingredients:
4-6 any bread slices
1 1/2 ltr milk
5-6tbsp sugar
5tbsp chopped almonds
5tbsp chopped pista
1tsp kesar
4-6 tbsp butterscotch sauce or any other sauce of your liking

Method: Boil milk in a heavy bottom pan and cook on sim till it reduces to half.. Keep stirring in between..It will be thick.. Add in sugar, kesar and half of almonds and pistas.. Cook for another 10mins and remove from flame..This is rabdi.. Let it cool.. Can refrigerate also... While serving, cut the bread slices into rounds using a round cutter or sharp edged bowl.. Apply butterscotch sauce between 2 bread roundels and cover it like a sandwich.. Make all the sandwiches same way.. Take a plate and pour one ladle of rabdi.. Place the butterscotch sandwich and pour another 3-4 ladles of rabdi on top till it covers the bread.. Garnish with remaining almonds and pistas and serve cold.. Can add in fruit pieces also while serving..


Monday, 22 June 2015

Nutella Mug Cake

“All you need is love. But a little chocolate now and then doesn't hurt.”  ― Charles M. Schulz
For the people who has those chocolate cravings after every meal, nutella mug cake serves as the perfect recipe with a sizable portion of the cake.. I always crave for chocolate based cakes and pastries as these are my top most favourite dessert which I can have any time of the day and can never get bored of it... And when I found this recipe online, my joy knew no bounds.. And now that i know its so easy to make, it makes all the more difficult for me to resist making this any time of the day..
                I have made only half the original recipe, as I felt the size of half the quantity of the original recipe was perfect for 1 individual serving.. The original recipe calls for all purpose flour.. I tried it with wheat flour as well, it came out equally well.. The only difference being, if you eat the wheat cake warm, you can make out the difference.. So it is better to cool down and eat if you are making it with wheat flour.. And do not microwave it for more than one minute, as that will harden the cake and also make it dry..  So, what are you waiting for.. Bake the cake and enjoy with a cup of coffee..


Recipe Source: Kirbiecravings
Ingredients:
2tbsp all purporse flour / wheat flour
2tbsp nutella
1/8 tsp baking powder ( take half quantity of 1/4tsp measure)
1 1/2 tbsp milk

Method: Take a microwave safe mug and mix all the ingredients thoroughly in the mug and microwave at high for exactly 1minute..If you insert a sharp knife in the cake it should come out clean.. If not microwave for another 0secs and not more.. But now that i have made so many times, im sure it will be done in one minute only..  Remove and let it cool for few minutes.. It might deflate a little.. Its completely fine.. Sprinkle castor sugar and serve in the mug itself.. Or drizzle an extra dose of chocolate sauce and serve with vanilla icecream..


Stuff Potato Shells

Potatoes are loved by all alike.... This recipe is my mum's which she makes very often... Here you can play around with the filling of your choice ie instead of mushrooms use sweet corn or cottage cheese or mixed veggies... And also instead of white sauce you can use amul cream to make it more creamier and in a jiffy.. But i simply love this original recipe without any changes to it... The combination of mushrooms stuffed in potatoes makes it more versatile... It was over sooner than it was made.. I could save only two for the click...


Ingredients:
4 big size potatoes
1 pack mushrooms chopped
2 small onions chopped
2tbsp oil
Salt
Pepper
5-6 fresh basil leaves chopped or any other fresh herb available to you
1/2 cup grated processed cheese
For white sauce:
1/2 tbsp butter
1/2 tbsp refined flour
1/2 cup milk
Salt
Pepper
Method: Cut the potatoes into horizontal and par boil them in salted water... Do not remove the skin.. Cool and scoop the inside with a spoon carefully. Keep aside..
To make white sauce: Heat butter in a pan and saute refined flour on sim till the raw smell disappears for approximately 2mins.. Take care it should not turn brown... Add in milk and whisk well to break all the lumps.. Cook till it boils.. Add in salt and pepper.. It should be a thick consistency so that it coats the mushroom filling..
To make the filling: Heat oil in a pan and saute onions till pink.. Add in mushrooms and cook on high flame till all the water dries up.. Add in salt, pepper and basil leaves. Mix well.. Add in the white sauce and mix till all the sauce coats the mushroom.. The filling is ready..

Now take the potatoes and fill the hollow with this mushroom filling.. Cover with grated cheese.. And microwave for 1min till cheese melts.. Serve hot...


Saturday, 20 June 2015

Pasta Salad

               
 Pasta salad is almost loved by all alike.. It gives the taste of a creamy pasta along with the freshness of salad... You can use any pasta for the salad.. be it macroni or fusili or penne.. according to your own liking.. Here I have used very tiny pastas (the shape of an eye lens)  knows as pastina, which is generally used in soups and broths, but these were available to me and so I wanted to use this for my salad...


                For the dressing i have used oats white sauce, recipe of which can be found in my list of recipes in sauce section..  You can even substitute it for mayonnaise or cream, but this oats white sauce has made the salad very healthy apart from making it creamy.. The vegetables can be added according to your own liking ie broccoli, mushrooms, sweet corn, purple cabbage etc.. Make sure you cut the vegetables approximately the size of the pasta ie if your using tiny pasta, chop it finely or the size of sweet corn, if your using fusilli cut it in juliennes.. This will give a uniformity to your salad and try making it as colourful as possible with all different coloured veggies..

Ingredients:
1 cup boiled pasta
1 small onion chopped
3-4 babycorn chopped and blanched
1 tomato chopped without pulp
1 small bellpepper (any color) chopped
Salt
Pepper
1/2 lemon juice
1tbsp olive oil

Method: Mix all the ingredients together and serve.. Incase you like, you can cool the salad in refrigerator for almost 2hrs and serve cold.. It tastes amazing.. But remember not to add onions if you refrigerate the salad.. Otherwise the smell of onions would start dominating the taste of salad..


Oats White Sauce

               
We all love italian food.. And white sauce is very widely used in the making of pastas and anything italian in most of the recipes.. How much ever we use wheat flour pastas and veggies in the dish,, lots of butter and all purpose flour which goes into the making of white sauce makes the dish unhealthy and also heavy on our stomach... Have you ever tried making white sauce healthier?? A white sauce which your family loves and you can have guilt free in your pastas and au gratins...
                Here I share with you all the secret of a healthy white sauce made with oats... Oats which is high in fiber and minerals, is a very good substitute for all purpose flour... The only drawback with respect to this sauce is that it might appear to be a bit sticky, but olive oil eases that out to a great extent... Use it in pastas, or as a spread in sandwiches, it serves as a wonderful sauce..
                I have used this white sauce to make a pasta salad which tasted amazing and it was hard to make out that white sauce used in it was made with oats..

Ingredients:
1tbsp olive oil
3tbsp oatmeal flour ( grind about 4tbsp of oats in a mixer to a fine powder)
1 cup milk
Salt and pepper as per taste
Method: Heat oil in a pan and saute oatmeal flour for 2mins. Do not let it brown.. Add in milk and stir continuously over low flame till it boils.. Make sure no lumps are formed.. Add salt and pepper...  Add more milk if the sauce appears to be too thick....Keep in mind that sauce thickens further when cooled..  So adjust thickness according to the preference ...White sauce is ready for use..
Note: Can add 1/4 cup grated cheese and extra 2-3tbsp of milk in the end to make it a cheese sauce..


Monday, 15 June 2015

Summer Fruit Punch


Summers are a great time to have something cool and refreshing.
I had this beautiful light coloured drink at my aunt's place and was totally in love with it. So refreshing, it just soothed my senses. So, i had to ask my aunt for the recipe. A must try drink and am sure u too will fall in love with it instantly.
Here for the recipe I have used mala's crushes and amul cream. The base of the fruit punch is that of litchi's.
Note: You can also change the base of the fruit punch i.e. use you can take any other flavored crush of your family's choice as base instead of litchi, and add the remaining crushes in the given quantity.

Summer Fruit Punch
Ingredients:
2 cups litchi crush
1/2 cup pineapple crush
1/2 cup orange crush
1/2 cup strawberry crush
1/2 cup cream
1 small lemon juice
2tbsp powdered sugar
3-4 tbsp crushed ice
1 bottle soda
Method: Blend together litchi crush, pineapple crush, orange crush and strawberry crush. Add in cream, powdered sugar, lemon juice and blend again. This serves as the base of the fruit punch mocktail. It can be stored in fridge for 3-4 days. While serving, in a tall glass, add 2tbsp of the fruit punch mixture, cover it with crushed ice. Again add 2tbsp of fruit punch mixture and layer it with ice. Now top it with soda and fill the glass. Garnish with mint leaves and a slice of lemon. Serve chilled.


Friday, 12 June 2015

Banana / Mango Oatmeal and Almond Smoothie


This smoothie serves as a powerhouse of energy.. If you have no time for breakfast, then this is the perfect substitute for a healthy, stomach filling and energy providing meal in the morning..
                Make sure your bananas are ripe.. Otherwise the smoothie doesnt taste well, neither you get the sweetness desired.. Incase you have bananas that are ripening fast, freeze them in your refrigerator and pop them out whenever you want to make a smoothie or milkshake..  Its an ideal way to use a ripened and frozen banana..
                I have never been a fan of oats.. I have always preferred cornflakes with my glass of milk rather than oats.. As oats had the tendency of being sticky.. I was bit apprehensive to try this recipe at first..But it was for my two and half year nephew, who is fond of bananas as well as oats.. I made this for him and tasted it myself too.. I fell in love with this smoothie.. The taste was so velvetty with the crunch of almonds in between and the sweetness of bananas.. It was simply superb.. And then there was no looking back.. I make this smoothie very often now.. It also serves the purpose of satisfying my taste buds for something sweet..

                Of late I have tried this recipe with mangoes too.. And it has still tasted very fascinating and delectable, serving the purpose of a whole meal with fruits and oats..

                So basically you can try this smoothie with any fruit you like and enjoy.. 


Banana / Mango, Oatmeal and Almond Smoothie
Ingredients:
1 ripe banana / mango peeled and chopped
1/4 cup oats
2-3 tbsp almonds chopped
1/4 cup thick yoghurt cold
1/4 cup cold milk
1tbsp honey

Method: Blend all the ingredients with a hand blender till the mixture thickens and pour in a tall glass. Garnish with 2 silvered almonds and 1/2 tsp oatmeal. Serve cold..
Tip - Freeze the fruit for an hour before you make the smoothie.. It would give you a much creamier taste without the need to add in ice..


Monday, 8 June 2015

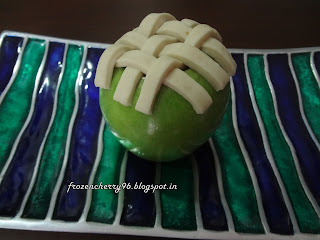
Stuffed Apple Pie

"If you want to make an apple pie from scratch, you must first create the universe." -- Carl Sagan
                Apple pie has known to be one of the most noblest desserts and is loved and savoured by people all over the world from ages.. Im not a fan of apple personally..I always tried to avoid having an apple all my life.. Till the time i had and apple pie.. It was the first time in Germany when i had tasted an apple pie and just loved the amazing taste of mushy apples, blended with the scent and flavour of cinnamon.. And then there was no turning back.. yes,, but only apple pie and not apples.. From then on I had never shunned away from trying the apple based desserts.. But still i could not get the same taste and flavour of the apple pie as i had it the very first time.. Untill i tried this stuffed apple pie...
                This stuffed apple pie is a modern age form of the classic old apple pie which is made using a pie crust as the base.. I always made the classic apple pie untill I saw this recipe in one of the cooking shows and wanted to give it a try.. As it seemed very easy and interesting.. Apple pie served in a very different manner which is even healthier...
               My dad loves having cinnamon based desserts.. Come winters,, and this is one thing he savours a lot.. Warm apple pie, straight out of the oven,, served with ice-cream...


Stuffed Apple Pie
Ingredients:
1 green apple ( i used granny smith apple)
2 tbsp crumbles sponge cake
2tbsp finely chopped apples (I used the scooped apple flesh after discarding the core)
1tsp butter
1/2 tsp cinnamon powder
1tsp sugar
For the pie crust:
3tbsp flour
2tbsp cold butter
1tbsp ice cold water
Method: For the pie crust: In a bowl take the flour and using your fingers mix in the butter till it resembles like a bread crumb.. Add in water and mix until the dough comes in together.. Cover and place it in refrigerator till you make the apple filling...
Chop off the top of the apple and scoop it from inside to make a hollow. In a bowl add crumbled cake, chopped apple, butter, sugar and cinnamon powder together  and mix well. Fill this in the hollow apple, pressing the mixture firmly.
Roll out pie crust and cut 1/4 inch strips and make a lattice pattern on the top of the apple covering the stuffing. Trim the edges with a knife to give an even shape.
Preheat oven to 220c. Take a baking tray and fill it with water as much to cover the base of the tray. Place apple in the tray and bake it at 220c for 25mins approximately till the pie crust turns golden brown and the apple is soft and mushy to touch. Remove and let it stand for a few minutes.. You will see the apple has turned pale green in color and also as it cools, the outside of the apple develops wrinkles.. It is fine..  Serve with ice-cream of your choice.. I served with butterscotch icecream for a nutty flavour and crunch..

Variations: Instead of cake crumble you can even use a cereal mix like oats and muesli for the stuffing making it even more healthy. Substitute honey instead for sugar.. It gives a very different flavour all together... Can add chopped almonds and walnuts too for a nutty flavour..


Saturday, 6 June 2015

Mexican Burger

Mexican burger.. A wholesome meal.. This is one dish which i make very often and my family loves it... It gives a break from the regular burgers that we eat..

Mexican patty is made with a base of kidney beans, which offers a lot of health benefits..  Mexican salsa is made with the greens of spring onion which again lends it a very unique and different taste..Im sure, you must have not tried this kind of salsa before.. All in all, its a must try recipe..

Mexican Burger
Ingredients:
For the patty
1 cup boiled lightly mashed kidney bean ie rajma
1/2 cup boiled and mashed potatoes
1/2 cup bread crumbs
1 onion chopped
1 small capsicum chopped
1 tomato chopped
2tbsp tomato sauce
1/2 tsp vinegar
4-5 cloves garlic crushed
2tbsp oil
Salt
1tsp red chilli flakes
For the salsa
1/2 cup spring onions chopped, bulb and leaves together
1 medium tomato chopped
1/2 cup colored bellpeppers chopped
2-3tbsp tomato sauce
2-3 tsp red chilli sauce / paste
Salt
Other ingredients
4 burger buns
4 cheese slices
Red chilli sauce / paste
Method: For the salsa: Mix all the ingredients and keep it aside for 1/2 hr allowing the flavors to blend..
For the patty: Heat oil in a pan. Saute onions till pink. Add garlic and saute again. Add capsicum and saute again. Add tomatoes, tomato sauce, vinegar, red chilli flakes and salt. Mix well and cook the mixture till most of the moisture is dried up. Let it cool. In another bowl take kidney beans, potatoes and bread crumbs.. Add the pan mixture to this and mix well. Adjust seasoning accordingly. Make patties and shallow fry in a pan..  Incase the patty dough is too loose add in more bread crumbs..
Assembling: Slice the burger bun in 2 halves.. Apply little butter and toast in a pan till crisp. On the bottom side apply red chilli sauce (can omit too), put a tbsp of salsa, top it with mexican patty and cheese slice. Cover it with the other slice and serve..


Thursday, 4 June 2015

Mexican Rice

Mexican food.. An all time favourite cusine, apart from chinese... Mexican cuisine resembles Indian cuisine in a lot of ways.. the cooking tools, the ingredients used as well as the method of preperations.. most of it is similar in both the worlds...
The mexican rice dishes resembles our Indian pulao..  The people in Mexico eat corn tortillas with almost every meal which is very similar to our Indian chapatis.. The salsa that they make which can be found chunky, semi - chunky or with a smooth texture with varied levels of spicyness is very similar to our Indian chutneys..
 Whenever i have any left over rice, try to incorporate all the mexican flavours into the rice.. Kidney bean,, my other favourite bean,, is one of the main ingredients in most of the mexican dishes.. So this is a perfect recipe to suit my tastebuds and curb my hunger anytime..

Mexican Rice
Ingredients:
2 cups cooked small grain rice
1/2 cup boiled red kidney beans ie rajma
1/2 cup boiled sweet corn
1/4 cup onion chopped
1/4 cup colored bellpeppers chopped
2tbsp tomato sauce
6-8 flakes garlic
6-8 dry red chilli
1tsp vinegar
Salt
3-4tbsp Oil
Method: Grind dry red chilli and garlic using a mortar and pestle. Heat oil in a deep pan. Saute onions till pink. Add chilli garlic paste and saute for another 2mins. Add bellpeppers and saute again till cooked. Next add sweet corn, kidney beans, tomato sauce, vinegar and salt. Mix well and keep covered for 5mins till all the flavours blend well. Finally add rice and mix well. Serve hot.


Wednesday, 3 June 2015

Mango Cheesecake


Mango!!!! The King Of Fruits... The only fruit which dominated my family when it came to fruits. They dont mind a mango with every meal for the whole of summer. Its like a sweet craving which is being satiated with mango. So, isnt this a perfect reason to make mango flavoured cheesecake for a family which have all the mango people living together.... Relished it till the last bite..!!!!!
             Coming to the cheesecake... For the base i used a cake base against the biscuit layer which is generally used.. We prefer it that way.. And i baked this sponge cake at home a day before in the same loosebottom tin, so that i could get the exact size of the tin.. Alternatively you can even take 1 cup of crumbled cake and mix 2-3tbsp of melted butter. Press this mixture firmly in the grease loosebottom tin and leave it in the refrigerator for 1/2 hr till you make the cheesecake filling.
          I have used only 2tbsp of powdered sugar as my mangoes were really sweet and so i didnt feel the need to add extra sugar.. And my family too loves it this way only.. A bit less sweet.. Incase your mangoes are not that sweet you can add more powdered sugar as per your taste and preference..

Ingredients:
1 9inch round sponge cake cut horizontally in a thin layer
1 box Britannia cream cheese ie 180gms
2tbsp powdered sugar
1/2 cup whipped cream
1 cup alphonso mango pulp
2 alphonso mangoes cut in small pieces
1/2 tbsp veg gelatin
1/8 cup warm water
Method:
For the base: Put the spong cake in the loosebottom tin and leave it in fridge while we make our filling.
For the cheesecake filling: Dissolve gelatin in warm water and mix it with mango puree. Sieve once. Combine the cream cheese and sugar and blend with a hand beater, till it becomes smooth and fluffy. Add mango puree and beat again with beater. Add the whipped cream and mix with light hands. Donot use beater at this stage. Then add mango pieces and  pour this mixture over the cake base and return it to the fridge for 3-4 hours until set. Before serving leave it out of fridge for 10mins so that the sides get loosened and cheesecake can be removed from tin.