Thursday, 5 October 2017

Cheesy Potato Stacks

               
A very easy and hassle free baked potato snack, which can be made well in advance and relished anytime.. Its definitely a crowd pleaser.. Who doesn't love potatoes.. And when combined with cheese and butter, makes it all the more inviting and scrumptious.. Add any flours according to your taste and preference, and make it a new snack each time..
                I made this for a friend of mine who came home for dinner.. At first, i wasnt sure if she would like it or not.. As it is a very simple snack to be served.. But to my surprise, she and her kid loved this easy snack a lot and was all praises.. This is what led me to blog about this recipe.. ANd i hope you all give it a try..


Cheesy Potato Stack
Ingredients:
3-4 potatoes
1tbsp butter
2tbsp parmesan cheese
Salt and pepper
2 cloves garlic chopped
Method - Peel the potatoes slice them wafer thin.. Take in a bowl and mix all the ingredients.. Brush muffin cups with butter and preheat oven at 200c for 10mins.. Now, stack 8-10 slices potatoes on top of each other and place in muffin cup.. Garnish with more freshly ground pepper and bake in oven at 200c for around 50mins, till the top and sides are golden brown in color and centres are cooked.. Remove from oven and let cool for 5 mins.. Demould and garnish with more cheese and greens.. Serve warm..
Note - you can use any cheese available to you, if you dont have parmesan handy..
Add mixed herbs, chilli flakes, all spice powder etc.. and change the taste each time..


Monday, 3 July 2017

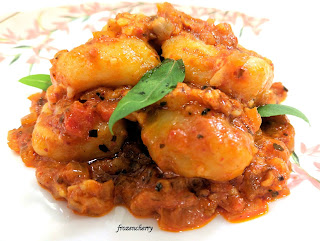
Gnocchi in Roasted Pepper and Tomato Sauce

When it comes to any dish Italian, we generally tend to eat either pizza or pasta or garlic bread.. Gnocchi is something i wanted to try making for long.. I had only few years back while I was in Germany... And even since it has been on my bucket list.. This dish is supposed to be quiet heavy as it is made of potato and cheese.. So it is generally had in smaller portions... But once you start having, you tend to overeat.. Its soo yumm.... The cottony soft dumplings of potatoes, when tossed in a smooth butter and cheese sauce, creates a magical moment, which is hard to resist..
                When i tried googling the recipe, the potato dumplings used eggs as binding agent.. Few used flour as a replacement.. And so i decided to go with it.. But then, I had to be very cautious in using flour as binding agent, as using it in excess would harden the dumplings.. SO the trick was to use as little flour as possible, at the same time be able to bind the dough and make dumplings too..  And this being my first try, i was bit nervous.. Nevertheless i decided to give it an attempt.. And trust meeeeeee, it has been one of the amazing endevour ever.. Got it prefect in the first try... Surprisingly soft, melt in mouth and cheesy..
This pasta can be made either in white sauce or red sauce or pomodoro sauce or bechamel sauce or any sauce that you like.. My family prefers arabiatta sauce and so i made it in red sauce with a twist.. I added a puree of roasted bellpepper to the tomato gravy and it made a noticable difference which was loved by all.. Im sure to try out other variants of gnochhi to very soon..


Ingredients:
2 boiled potatoes
1/2 cup maida
Salt
For sauce
1 red bell pepper roasted and peeled
4-5 tomatoes blanched and peeled
1 onion chopped
3-4 cloves garlic chopped
2tbsp Cream
Salt
Red chilli powder
 Red chilli flakes
 Oregano
Garnishing
3-4tbsp grated cheese
Few leaves of basil
Method - Heat olive oil in a pan.. Saute onions and garlic.. Puree tomato and red bell pepper and add to the pan.. Cook till it is thick and can coat well.. Add spices and cream.. Simmer for few minutes..
To make gnocchi, mash / grate potatoes and add salt and maida 1tbsp at a time and knead into a soft dough.. It will be slightly sticky.. Boil salt and water in a large pot.. Roll out the dough in long rope on a dusted surface and cut into 1inch bites.. Shape it with fork.. Place one by one in the pot of boiling water and cook for a minute or two till it floats on top.. Remove using a slotted spoon and add directly in the sauce.. Cook on slow lame for few minutes.. Garnish with cheese and basil and serve..
Note - First make sauce and then add gnocchis directly into the sauce.. If gnocchis are made before hand and left to cool before adding to the sauce, they might tend to get hard..

Pictorial Representation of Gnocchi..


Friday, 24 February 2017

Crouton Salad

A salad is not a meal.. It is a style... "Fran Lebowitz"
A well made salad is the easiest way to impress anybody with your culinary skills.. As summers have set in early here, I dont feel like spending most of my time in the kitchen.. So im trying to whip up different kinds of salads which can serve as a healthy meal and also save my time in the kitchen.. So here's a salad made using croutons which makes it a filling meal..
Crouton is derived from a French word "croute",  which means crust..These are basically toasted / baked / pan fried pieces of bread.. Generally, the bread used here is a day ol bread, which gives a better crust and crispiness than a fresh bread.. So, if you have any stale bread left, it can be used to make these croutons, which can be used in countless ways.. Garnish your soup with these croutons, pep them up with some cheese and seasonings and serve as a snack or turn them into a salad.. It is sure to make you keep munching on these more and more..

Ingredients:
4 slices brown bread
1 small onion chopped
1 tomato deseeded and chopped
1/2 capsicum chopped
1/2 cucumber chopped
1/4 cup purple cabbage chopped
For dressing:
3tbsp olive oil
1tbsp mustard paste
1.5tbsp balsamic vinegar
1tsp powdered sugar
Salt to taste
1/2tsp black pepper powder
Method - Mix all ingredients of dressing and whisk well until well incorporated.. Keep aside for the flavors to blend for 15-20 minutes.. Meanwhile remove the crust of bread and chop into medium size croutons.. Spread on a baking sheet and bake in a pre - heated oven at 180c for around 5 - 7 minutes (turning the croutons once mid way)  till it becomes crunchy and color changes to golden brown..  In a bowl add all the chopped veggies and pour the dressing.. Mix well to coat all the veggies.. Just before serving add the croutons and mix with light hands.. Garnish with parsley or olives or mixed herbs and serve..
Note - You can add veggies as per your choice and taste..
Add croutons to salad just before serving, otherwise it tends to get soggy..
You can substitute balsamic vinegar with regular vinegar / apple cider vinegar / lemon juice


Friday, 27 January 2017

Mexican Quiche

Quiche is a French dish meaning cake or tart.. Its an open pie with a savoury filling of cheese and vegetables, baked to perfection.. It generally contains eggs which help in setting the filling in the tart, giving it a firm shape.. But, as i had to make it without eggs, i had to make sure that my filling was firm enough which could set easily with the help of cheese..

Perfect slice of quiche without the filling falling apart

I have had quiche many times in the past.. Basically an italian kind of quiche with white sauce, vegetable and lots of cheese.. I wanted to try something different this time.. And so i came up with this mexican quiche.. I made a filling of kidney beans and corn with mexican flavours and combined with a cream and cheese mixture instead of regular white sauce.. I was not sure of how it would taste as i even made the dough using corn meal and not just maida.. It was a total experimental quiche this time.. I seriously wanted to give this a try.. So i went ahead with the idea of making this mexican quiche.. I started it with the dough.. The addittion of cornmeal in the dough required me to use some extra water and oil than i normally require for while making the quiche dough.. It was fine.. I could knead a fine smooth dough.. First trial was successful.. Making the filling was no big task.. As i was aware of this mexican filling.. I made something similar to be filled in my quesadillas, and also used similar kind for my mexican rice.. So i was sure of the filling.. Once my dough and filling were ready, i went ahead with assembling the quiche.. Rolled the dough, layered it in pie tin, basted with some chilli garlic chutney for that extra punch, spread the filling and now was the time to pour the cream and cheese filling.. This part was the most skeptical for me.. As this was the only step which was essential on setting of the quiche.. I had to be sure to add enough cheese to set the quiche and enough cream to help keep the mixture moist and not make the tart soggy at the same time.. I decided to add the cream sparingly and cheese generously.. Somewhere back of my mind I knew this would work.. And now was the time to bake my quiche.. In went my quiche in a preheated oven.. Fingers crossed.. I tried to keep myself diverted all the time while the quiche baked.. But in vain.. I kept peeping inside the oven every few minutes.. The crust firming up.. The cheese on top bubbling and turning golden brown.. A perfect visual treat.. And once baked, i removed it from the oven and allowed to cool for few minutes.. And then was the time for me to cut a slice from the quiche.. Lo, Behold.. Perfect as imagined.. Crust - crisp.. Filling - firm and set... Taste - yummm and cheesy and moist enough.. Success achieved.. My quiche was upto the mark.. It raised my self confidence.. And now on, my take on quiche with different fillings starts.. For now.. relax and enjoy this.. err bake this mexican quiche for time being..
This is how my brother loves to eat his share of quiche.. Crustless.. :P

Ingredients:
For the dough -
1 cup maida
1 cup corn meal
1/4 cup cold water
1/4 cup olive oil
1/2tsp salt
For the filling -
1/2 cup kidney beans boiled
1/4 cup corn
1/4 cup capsicum
1/4 cup onions chopped
2tsp garlic chopped
Salt to taste
1tsp Red chilli flakes
2tbsp olive oil
1/2 cup heavy cream
3/4 cup cheese grated
Method: For the dough - mix water and oil with the help of a fork.. Let the emulsion blend completely.. Mix maida, cornmeal and salt in a bowl and add the emulsion.. Make a dough.. Grease an 8inch pie tin.. Roll the dough into 1/4inch thick round.. Layer it in the pie tin and press firmly.. Make marks with fork so that it doesnt fluff up while baking.. Place it in refrigerator covered till you make the filling..
For the filling - Heat oil in a pan, saute onions and garlic till translucent.. Add in capsicum and saute for a min.. Add in corn, kidney beans, salt, red chilli flakes.. Mix well and cook for 2-3minutes.. Close the flame and let it cool..
Preheat the oven at 200c.. Take the pie dish out of the refrigerator. Bast the base with some chilli garlic sauce and fill it 3/4th with the filling.. Heat heavy cream and till warm and add 1/2 cup cheese..Mix well..  Add this in the pie dish over the filling.. Again cover it with remaining cheese.. Sprinkle some red chilli flakes on top.. Bake at 200c for around 30-40minutes till the cheese is golden brown..
Note - Corn meal here used is makki ka atta..
You can use any filling of your choice..
I have used amul cream..


Thursday, 12 January 2017

Broccoli Fritters

Broccoli fritters are perfect for those tea time snacks.. Light, healthy, filling and yet delicious.. They can be eaten all by itself or stuff them in your burgers for a healthy twist..
Broccoli is now in my list of favourite vegetables.. Earlier it was difficult to find or even see broccoli in my vegetable market.. But now as i can find them easily, its a regular vegetable in my home.. I love having it as a curry, as a soup or simply roasted.. Be it an form, i can devour it happily.. But then, i like to keep trying and experimenting new dishes.. And so, these broccoli fritters were born..
Fritters are generally fried snacks.. I wanted to make a healthy fritter with broccoli.. And so i ended up shallow frying them.. I avoided adding any all purpose flour to the mixture and in lieu, gave the binding using flaxmeal.. It is a great ingredient to use for binding mixtures.. And at the same time, making it healthy too..


Ingredients:
2 cups broccoli chopped finely
2 cloves garlic chopped
2-3 green chillies chopped
2tbsp coriander chopped
1/2 medium onion chopped
1.5tbsp flaxmeal mixed in 3tbsp water
Salt to taste
1tsp red chilli powder
1/2tsp cumin seed powder
3tbsp processed cheese grated
3tbsp bread crumbs
2-3tbsp rice flour
For yoghurt and lemon dip
1/2 cup yoghurt
1tbsp lemon juice
Salt
1 clove garlic chopped
1tbsp coriander chopped
Method - Mix the ingredients of dip and keep aside..Cook broccoli with around 2-3tbsp of water, covered, on a low flame, till it is tender enough, approximately 5minutes..  Remove in a bowl and let it cool.. Add in all the other ingredients.. Make patties and shallow fry.. Serve with dip..
Note - I have used the broccoli florets as well as the stems.. Chopped them in food proceesor..
Use salt sparingly, as there is salt in cheese as well..

You can make the patties and store in refrigerator covered, if you want to serve later..

 Cooked Broccoli


 Add coriander, pnion, garlic, green chilli and flaxmeal

 Add spices

 Add breadcrumb, riceflour and cheese
 Make patties
 Shallow fry
Serve with dip


Monday, 2 January 2017

Nolen Gur Shahi Tukda

           
Shahi Tukda is a dessert made with bread and rabdi.. The twist here is, the rabdi has been made using Nolen Gur / jaggery which is made with date palm and generally available only during winters.. This is a very authentic gur and very healthy from the regular gur that we get..
            I have always had sweet rice made of gur, which my mother makes very often for my family.. Its the first time i have used gur to make rabdi and the outcome has been fantastic..
           
Coming to shahi tukda, it has been one of my favourite Indian desserts.. And one of my fond memories relating t oshahi tukda is when i was in school and we used to go on picnics, my dad wud make this special dessert for me as well as my friends, so that we all could relish it together.. Since then, this dessert holds a special place in my heart..
            Generally when shahi tukda is made, the bread is first cut in cubes and shallow fried in ghee.. It is then dipped in a thick sugar syrup and then rabdi is spread over it.. But here, as we are using gur to make rabdi and trying to make it healthy, i toasted the bread with some butter and skipped dipping in sugar syrup.. Instead made rabdi of bit thin consistency and baked the bread pieces placing in rabdi.. The outcome has been immensely satisfying.. The texture was soft as well as crunchy with authentic flavors of gur coming out beautifully..

Ingredients
8 to 10 slices of white bread
2 tbsp of butter
1 ltr full cream milk
1/2 cup cream
1cup Nolen gur( Khajur gur)
Pistachios
Directions
Boil the milk and reduce it to half , to this thickened milk add cream n stir. Add the Gur and stir till it melts completely. Switch off the gas.
 
Meanwhile Cut of the bread sides from all four sides. Cut them diagonally. On a tawa or pan put some butter and toast the bread slices till golden brown and crunchy. Plate these bread pieces on a shallow baking dish and pour the rabdi. Bake this at 180 degrees for 15 mins in a pre heated oven. The bread gets soaked but a corner which is not submerged in milk remains crunchy.
Decorate with pistachio and rose petals or as desired.
Note - Can avoid cream and use only milk to make it low fat..
You can even add around 100gms of grated paneer to the rabdi mixture to give it a textured base..
Can use regular gur also to make this dish..


Friday, 2 December 2016

Couscous Salad With Grilled Vegetables in Honey Vinaigrette dressing


Few years back when my brother stayed in Germany and when i went to visit him, that was the first time I had couscous in a farmer's market.. It had a very soft texture and was subtle in taste.. I loved the taste of it.. And then i started surfing the net on what couscous is and how it is made..
Couscous originated in North Africa, consisting of tiny granules made from steamed semolina.. These tiny white pearls are bland in flavor,  and so they readily soak up the flavor from other ingredients added to it... 
There were many versions available to it with the varying water content to soak couscous and the flavors differing according to the taste and preference.. One thing i could derive was couscous was made with mild flavors and spices keeping it subtle..
From then on I made couscous quite a few time and then settled on this version below.. I like to keep it simple and serve with grilled vegetables on the side..


Ingredients for couscous
1 cup couscous
2cup boiling water + 1tsp salt + 2tsp olive oil
1 tbsp olive oil
3-4tbsp spring oions chopped (white part)
1 medium size tomato deseeded and chopped
3-4 spring greens chopped
Salt
Pepper
For Grilled Vegetables
4-5 french beans blanched
1/2 cup broccoli florets blanched
2-3 babycorn cut length wise
1/2 cup coloured bell peppers cut in chunks
1/2 cup pumpkin cut in chunks
2-3tsp olive oil
5-6 olives chopped
For dressing
1tbsp honey
2tsp balsamic vinegar
Salt
Pepper
Method: To make couscous - Add salt and olive oil in boling water.. Then add couscous and keep it covered for few minutes till it absorbs all the water and swells up.. Heat olive oil in a pan.. Saute spring onions for few minutes.. Meanwhile fluff up the couscous with the help of a fork to separate it.. Add this in the pan and mix well.. Switch off the flame and add in tomatoes, spring greens, salt and pepper.. We donot want to cook the tomatoes and spring greens.. Mix lightly.. Keep aside..
Mix ingredients of dressing and keep aside..
For grilled vegetables - Heat oil in a griller and saute the vegetables one by one except olive.. Remove in a bowl, add olives and pour the dressing over the veggies.. Mix well and keep aside for few minutes..
Serve warm couscous salad with sauted vegetables on the side..
Note - Can even add lemon juice instead of balsamic vinegar in the dressing..
Use vegetables available to you and of your choice..
You can even grill the vegetables and add the couscous in it and mix.. Instead of serving it separately..